编辑项目根目录下的 pom.xml 文件,在 <dependencies> 加上 MySQL 的依赖:
<dependency>
    <groupId>com.mysql</groupId>
    <artifactId>mysql-connector-j</artifactId>
    <version>8.1.0</version>
</dependency>
编辑项目的 src/main/webapp/META-INF/context.xml 文件,并调整数据源定义以指向 MySQL,如下:
<Resource name="jdbc/invoicingDB" auth="Container"
    type="javax.sql.DataSource"
    maxTotal="100" maxIdle="20" maxWaitMillis="10000"
    username="root" password="r123456"
    driverClassName="com.mysql.cj.jdbc.Driver"
    url="jdbc:mysql://localhost:3306/invoicingdb"/>
以上代码已经在 context.xml 中,可以直接取消注释并修改,使用您自己的 url、用户名和密码。最后记得得注释目前指向 HSQLDB 的数据源。
最后,编辑
src/main/resources/MEFA-INF/persistence.xml 文件,並在 <properties> 添加 MySQL8 dialect “
org.hibernate.dialect.MySQL8Dialect” 如下:
    <persistence-unit name="default">
    	<provider>org.hibernate.jpa.HibernatePersistenceProvider</provider>
    	<non-jta-data-source>java://comp/env/jdbc/invoicingDS</non-jta-data-source>
    	<class>org.openxava.session.GalleryImage</class>
    	<class>org.openxava.web.editors.DiscussionComment</class>
    	<class>com.openxava.naviox.model.ConfigurationRecord</class>
    	<class>com.openxava.naviox.model.Folder</class>
    	<class>com.openxava.naviox.model.History</class>
    	<class>com.openxava.naviox.model.Module</class>
    	<class>com.openxava.naviox.model.ModuleRights</class>
    	<class>com.openxava.naviox.model.Organization</class>
    	<class>com.openxava.naviox.model.Role</class>
    	<class>com.openxava.naviox.model.SessionRecord</class>
    	<class>com.openxava.naviox.model.User</class>
        <properties>
            <property name="javax.persistence.schema-generation.database.action" value="update"/>
            <property name="hibernate.dialect" value="org.hibernate.dialect.MySQL8Dialect" />
        </properties>
    </persistence-unit>
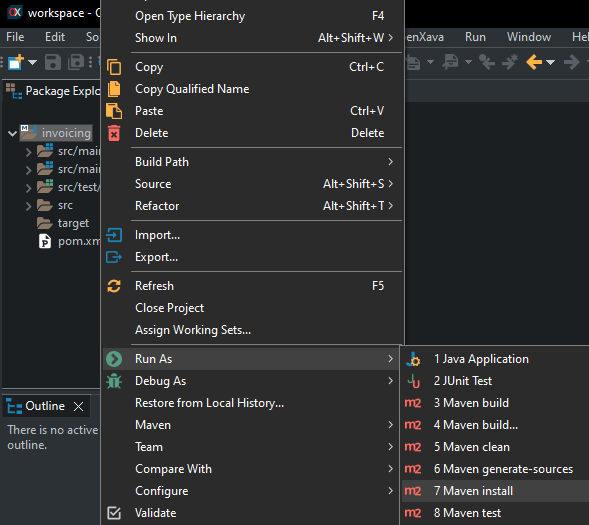
在进行这些更改后,重新构建(rebuild)项目。在OpenXava Studio中,右键点击项目,选择Run As > Maven install。
第一阶段已经好了,现在我们需要在 Eclipse 中创建 JPA 项目。
创 建 JPA 项目并连接到数据库
剛剛安装的 Eclipse 包含了 Dali 和 DTP(Data Tools Platform)。如果您沒有安裝該安裝包,可能得手動安裝 Dali 跟 DTP。
打开 Eclipse 并创建一个 JPA 项目,选择 File > New > JPA Project。

输入项目名称,然后在 Target runtime 中选择已安装的 Java 1.8 版本或更高的版本,JPA 版本选择 2.2。

点击 Next 两次,直到看到以下视窗。在 JPA implementation 中,不启用库配置,点击 Disable Library Configuration。然后,点击 Add connection 创建与数据库的连接。

在弹出的窗口中,选择我们的数据库,在本文我们会使用 MySQL,而在 Name 可以为此连接命名。

在这里我们将选择用于连接的驱动程序。目前并没有,所以得创建一个新的驱动程序。

选择MySQL JDBC Driver 5.1,并在 Driver name 为驱动命名好以后识别。

现在得删除默认的 mysql-connector-java-5.1.0-bin.jar,选择它再点击 Remove JAR/Zip 然后通过点击 Add Jar/Zip 添加
新 下载的驱动程序。下载时得选 ZIP 格式,最后再点击 Ok。

完成后大约是这样,再次点击 Ok

您会回到之前的窗口,在此处填写所需的数据。在 Database 中,可以使用任何名称来区分它与其他的连接,URL 中需要放入数据库的连接信息,最后填写数据库的用户名和密码。完成后,你可以通过 Test Connection 测试连接是否正确,然后勾选 Save password 并点击 Finish。

现在您会看到开始时的第一个窗口,在那里勾选Override default schema from connection 并选择连接的模式,然后点击 Finish。现在,JPA 项目和数据库的连接已创建。

点击 Finish 后,有可能会弹出一个打开 Data Source 的窗口。如果没有,你可以在Windows > Show View > Data Source Explorer 中打开。

如果在 Show View 中找不到它,请从Other... 手动添加,输入data source。

现在,您可以在 Data Source Explorer 面板中看到与数据库的连接。

在 Eclipse 里从数据库的表生成实体
本文的最终目标是从数据库的表生成实体。现在我们已经建立了连接,接下来是生成。右键点击项目,选择 JPA Tools > Generate Entities from Tables...

在这里,您需要选择要为其生成类/实体的表。我们将选择除了OpenXava自动生成的images和oxdiscussioncomments以外所有的 表。

在此视图中,它会显示所有表之间的关系。你可以添加或删除所需的关系。然后点击 Next。

在此视窗,有多个选项可供选择。我们将保留所有默认设置,仅在 Collection properties type 中更改为 java.util.List,并勾选 Always generate optional JPA annotations and DDL parameters 选项。在 Package 必须输入与 OpenXava 相同的,我们的示例中为 com.yourcompany.invoicing.model,然后点击 Next。

在这里,我们可以逐个浏览表格,调整每个属性。例如,OpenXava 不使用 TINYINT、BLOB、GEOMETRY 等。

选择属性后,我们可以更改其名称以及属性的类型,以及该属性是否为 ID。点击 Finish 后,等待生成所有类。

生成的类位于 src/main/java 文件夹中,包名为我们之前定义的 com.yourcompany.invoicing.model。将这些生成的类复制并粘贴到一开始创建的 OpenXava 项目中的 com.yourcompany.invoicing.model 包中(您得创建此包)。

调整代码以在 OpenXava 使用
虽然自动生成的代码已经足够了,但尚无法完全在 OpenXava 应用程序中运行。我们将进行一些修改,其中一些是可以选择不改的。
在 Author 类中,我们有一个与 Product 的@OneToMany 关系,它指示每个作者可以拥有许多产品。换句话说,我们希望显示与所选作者相关的多个产品。因此我们添加了一个 @ListProperties() 注解,参数为 "number, description, price"。
public class Author implements Serializable {

...

@OneToMany(mappedBy="author")
@ListProperties("number, description, price")
private List<Product> products;
在 Invoice 类中,我们有两个关系,一个是与 Customer 的 @ManyToOne,另一个是与 InvoiceDetail 的 @OneToMany。我们将保留 Customer 不变,但在 InvoiceDetail 中删除 @OneToMany 注解,然后添加两个注解, @ElementCollection 和 @ListProperties("product.number, product.description, quantity")。
public class Invoice implements Serializable {

...

//@OneToMany 删除此注解
@ElementCollection
@ListProperties("product.number, product.description, quantity")
private List<InvoiceDetail> invoiceDetails;
在 InvoiceDetail 中,注意这个类没有任何 @Id 属性,因为在它的逻辑中,它是一个嵌入的类。所以将 @Entity 更改为 @Embeddable,并删除与 Invoice 的关系,因为我们对此不感兴趣。
@Embeddable
//@Entity remove this annotation
@Table(name="invoice_details")
@NamedQuery(name="InvoiceDetail.findAll", query="SELECT i FROM InvoiceDetail i")
public class InvoiceDetail implements Serializable {
	private static final long serialVersionUID = 1L;

	@Column(nullable=false)
	private int quantity;

	//bi-directional many-to-one association to Product
	@ManyToOne
	@JoinColumn(name="product_number")
	private Product product;

	 //删除此关系和其方法
	//@ManyToOne
	//private Invoice invoice;

	//public Invoice getInvoice() {
	//	return this.invoice;
	//}
	//public void setInvoice(Invoice invoice) {
	//	this.invoice = invoice;
	//}

 }
最后,我们需要调整 Product。它有 3 个关系: InvoiceDetail、Author 和 Category。我们对 InvoiceDetail 的关系不感兴趣,但对其他两个感兴趣。在 Author 和 Category 上添加一个 @DescriptionsList 注解。最后,删除与 InvoiceDetail 的关系及方法。
//add @DescriptionsList to Author and Category
@ManyToOne
@JoinColumn(name="author_oid")
@DescriptionsList
private Author author;

@ManyToOne
@JoinColumn(name="category_oid")
@DescriptionsList
private Category category;

//删除此关系和其方法
//@OneToMany(mappedBy="product")
//private List<InvoiceDetail> invoiceDetails;

//public List<InvoiceDetail> getInvoiceDetails() {
//	return this.invoiceDetails;
//}

//public void setInvoiceDetails(List<InvoiceDetail> invoiceDetails) {
//	this.invoiceDetails = invoiceDetails;
//}

//public InvoiceDetail addInvoiceDetail(InvoiceDetail invoiceDetail) {
//	getInvoiceDetails().add(invoiceDetail);
//	invoiceDetail.setProduct(this);
//	return invoiceDetail;
//}

//public InvoiceDetail removeInvoiceDetail(InvoiceDetail invoiceDetail) {
//	getInvoiceDetails().remove(invoiceDetail);
//	invoiceDetail.setProduct(null);
//	return invoiceDetail;
//}
运行应用程序
点击 Run 按钮,等直到控制台显示“应用程序已启动”,如下:
现在您的应用程序已经在运行。请开启您的浏览器(Chrome, Firefox, Internet Explorer 11, Edge o Safari)并输入以下连结:
这是您第一次运行此应用程序,请点击登录按钮并在用户/密码中输入 admin/admin 再点击登录

在左侧是模块面板,当前我们位于 invoices 模块,在那里首先显示实体 Invoice 的属性,中间显示与 customer 的 @ManyToOne 关系,最后是 invoiceDetails 的集合。请注意,OpenXava 的一个特性是根据它的注解,会以不同的方式显示属性,有关更多信息,你可以参考
OpenXava 的课程。
 对教程有任何疑问吗? 请在论坛中提问 一切顺利吗? 继 续 OpenXava 的课程


